Synology
Install Nano on Synology
This post will show you how to install Nano on your Synology NAS. Many people prefer Nano since Nano is easier to use than VIM. Luckily the Synology NAS allows you to add additional software repositories and install Nano easily.
Enable SSH Access
You must enable SSH access to use Nano on your Synology NAS.
Click on the ‘Control Panel’ icon and then click on ‘Terminal & SNMP’. Finally, tick the option called ‘Enable SSH Service’ and click ‘apply’.
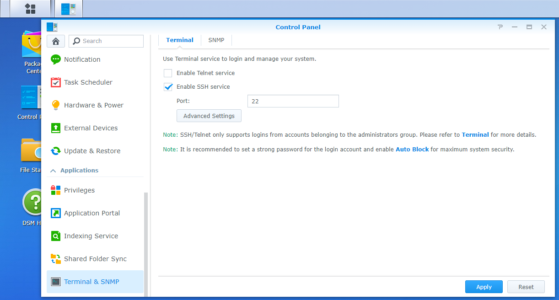
Synology NAS, Terminal & SNMP, Enable SSH Service
Add a repository
Nano is not provided or maintained by Synology, but you can get it from the SynoCommunity repository. In addition, SynoCommunity provides free packages for Synology NAS devices. Visit them at https://synocommunity.com/ and feel free to explore some of the other packages they have to offer, like Git, Home Assistant, and of course, Nano.
To add the SynoCommunity repository:
Click on the ‘Package Center’ icon and then click on the ‘settings’ button.
In the ‘settings’ window ‘general’ tab, click on the ‘Synology Inc and trusted publishers’ radio button in the’ trust level’ section.
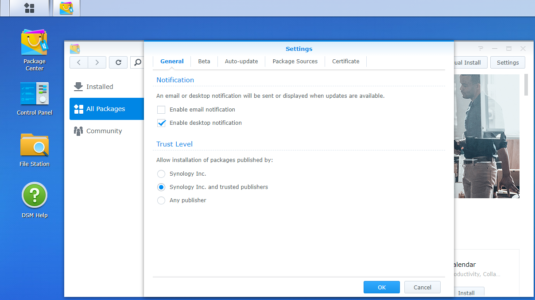
Synology NAS, Package Center, Settings, Trust Level
On the ‘settings’ window ‘package sources’ tab, click on the ‘Add’ button and add the repository: Name: SynoCommunity Location: http://packages.synocommunity.com/
Click on the ‘Ok’ button once you are done.
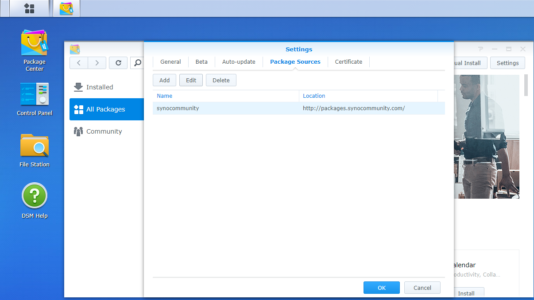
Synology NAS, Package Center, Settings, Add Repository
Install Nano from the Repository
The final step is to install Nano. To do this, make sure you are still in the ‘package centre’. Then, click on the ‘community’ section, find ‘SynoCli File Tools’ and click on the ‘install’ button. The SynoCli File Tools package provides the following command-line utilities: less, tree, ncdu, jdupes, rhash, mc, nano, file, detox, rmlint, and rnm v1.1-3. Nano was previously a separate package but is now only available via the SynoCli File Tools package.
Wrapping up
You can now run Nano using SSH in the usual way! Type ‘nano’ and the file name you wish to open. Remember that you will need ‘sudo’ in some circumstances, depending on what you need to do.